Showing posts with label InDesign. Show all posts

Monday, March 30, 2009

Fooling Around with InDesign

Since April 1st is just around the corner, I thought it would be a good idea to show off a few different ways in which you can mess with a co-worker on April Fools day. Be warned, you may not be employed on April 2nd if you try these techniques on your boss. I don’t recommend doing all of these because it will be obvious that you did something. Just choose one or two and observe the results from a save distance, preferably behind bullet-proof glass.

Change all of your layers colors to white
This will make it impossible to for anyone to tell if they have anything selected. Bonus points. Edit the layer and uncheck print, now everything on this layer will be non-prining.

Change the keyboard shortcuts
Cmd(ctrl)+S changed to Quit
Cmd(ctrl)+Q changed to Save

Hiding Menu items.
Under the edit menu, you can choose menu’s at the bottom. In file menu, turn off save, save as, save a copy, place, print and package. Since you have changed the keyboard shortcuts, they will probably try the menus next, but they won’t be there!

Default Font
Change the default font in the basic paragraph style to something lovely like comic sans 72pt magenta 3pt leading.

Swatches
Rename the colors in the swatches panel. If you are clever (which I am not), you could create sentences with the names. For bonus points, change them all to spot LAB colors.

Preferences

  • Change the tools tips to none (who needs reminders)
  • Turn the thumbnail previews for placing off.
  • Turn on auto collapse for panels (this will drive them mad)
  • Change the ruler units to custom and put in 256 pt

  • Change the snap zone for guides to 36. Now if you even get remotely close, everything will just get sucked over to the guide.
  • Move the raster image view settings to the far left which will grey out every image.
  • Change the Greek Type Below to 128 pt. Good luck editing

Misc
If you are looking for other non-InDesign related pranks I recommend my favorite subtle prank. Every morning go to a co-workers desk and remove all of the staples from their stapler before they get to their desk. Do this every day consistently. At first they may not notice, but eventually it may drive them mad.

Friday, February 13, 2009

Instructor Tips and Tricks

InDesign tips and Tricks:

Cmd+Opt+G will select all of the guides on any given page.

Cmd+click to select objects that are underneath other objects.

Shift-double clicking on the ruler will put a guide across the spread to the nearest tick mark.

Everyone knows that Cmd+A selects all, but few people know that Cmd+shift+A deselects all.

New in CS3 - Double-click to switch between the black and the white arrow.

New in CS3- If you are typing, hit ESC to "escape" out of a text box and select the box with the black arrow.

Duplicate and copy & paste is so last century. Opt+drag to drag a copy of whatever you are working on.

Tuesday, December 2, 2008

You're in my Heart and InDesign

This video was shown at the InDesign Master Class in Seattle a few weeks ago. It was created using Adobe After Effects new Cartoon effect.

For more information about this video, check out the original video at InDesign Secrets

Wednesday, November 26, 2008

InDesign Secrets Contributor


I just wanted to announce that I am now a contributor on InDesignsecrets.com
Check it out, it is an amazing resource for all things InDesign.

Thursday, October 16, 2008

Adobe Updates InDesign CS3 to 5.0.4

According to Adobe, InDesign CS3 5.0.4 is a compatibility update, addressing issues with the recently released CS4. The update also provides fixes for File Size, Hyphenation, Performance, Anchored Objects, Character Alignment, Step and Repeat, Indexing and Table of Contents, Text and Fonts, Dictionaries, Color, Scripting, Import/Export Graphics, InDesign Interchange files (INX), XML, Library files, and Printing.

Wednesday, October 15, 2008

InDesign CS4's New features

Here is a listing of InDesign CS4's new features. This is not necessarily an exhaustive list, but it will definitely point out the newest features

Smart Guides/Spacing

Say goodbye to the align panel with smart guides. As you move frames around on the page, guides will temporarily pop up and help your frame snap to the right spot. If this annoys you, don't worry since you can always turn it off.

Spread Rotation

If you work on packaging, you will wonder how you ever worked without spread rotation. This alloys you to temporarily rotate a spread 90° and make changes. This will really save your neck.

Table editing in story editor

Overset text problems in tables are now fixed forever. Before CS4 it was impossible to edit the overset copy in a table, but now we finally can. As an added bonus, InCopy users will be able to track changes on tables too.

Redesigned Links Panel

The new links panel has been completely redesigned from the ground up with an almost ridiculous amount of information. You can now choose which information you want to see including effective resolution, thumbnails and status. The ability to sort the links by these traits is also incredibly useful.

Preflight Panel.

Preflight is finally fixed! This is hands down the most useful new feature. Preflight is now very customizable. You can set up warnings to stretched images, missing fonts, live area and much much more. The best part is that once you have a profile set up, ID is constantly checking it and will let you know if there is a problem and even offer how to fix it!

Flash Export

There are now two new different ways to get your ID layout on the web. The first option is the ability to export your pages as a swf. This lets you make a simple slide show of your work, or the ability to move between pages of a magazine. The second way is to export your layout as a XFL file which can be opened inside of Flash. This will allow a flash developer to add rich interactivity to your files and create a dynamic website.

Tuesday, October 7, 2008

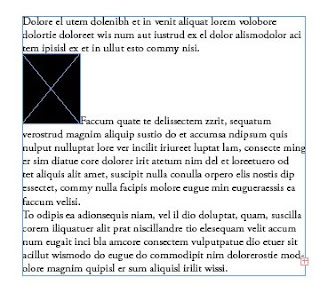
How to turn an inline object into an anchored object in InDesign


If you deal with manuals or longer technical data, InDesign's inline anchored objects are a huge time saver. Unfortunately, some people don't realize that it is possible to convert an inline graphic into a anchored object. Here are are the steps you need to take to convert an inline object into an anchored object.

  1. Select your inline object with the selection tool.
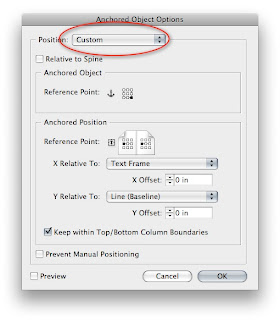
  2. Go to the Object > Anchored Object > Options menu
  3. Change the position option from "inline or above line" to "custom"
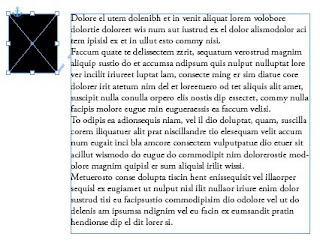
  4. Now it is an anchored object and you can freely move the graphic around the page.

Wednesday, August 6, 2008

Hiding Master Page items


A client contacted me yesterday with a problem they were having with masterpages. After talking to them on the phone to make sure they were doing everything correctly, they sent me the files so I could take a look.
After take a closer look at the files I realized that the masterpage was being applied correctly, but the masterpage items themselves were not present. That is when I went to the pages panel menu and noticed that "hide master items" had been chosen. After choosing "show master items" from the menu, everything went back to normal again.

Tuesday, July 8, 2008

Come learn direct from Adobe and nationally recognized experts!


This year C2 is hosting the new 2008 Creative Transitions Conference here in Milwaukee. This is a unique opportunity for all creatives, whether you are in print, web, video, animation, or multimedia. The three day conference runs August 13-15, 2008 at the Milwaukee Hilton City Center.

We are bringing the talent to you - no need to fly to the east coast or down to Chicago to learn from the best. Speakers for the 2008 conference include: Anne-Marie "Her Geekness" Concepción, co-host of the popular InDesignsecrets.com podcast and InDesign guru; Lesa Snider-King, author, istockphoto guru, and a nationally recognized Photoshop Expert; Adam Pratt, Adobe Senior Solutions Engineer and co-host of Adobe TV's "The Lazy Designer"; Michael Kanfer, Adobe Business Development Manager and Academy Award Winner for Visual Effects (Titanic, 1998); Tom Petrillo, Adobe Senior Solutions Engineer; and many more!

Sessions can be attended at will - no confusing schedules or limiting track-only presentations. You choose who you want to see!

Day three will feature hands-on workshops hosted by many of our speakers and C2 certified instructors. Three hours of training direct from the experts!

Exhibitors from Adobe, C2, istockphoto, Shutterstock, Widen Enterprises, O'Reilly Media, Proven Direct, and more will be presenting their products and services throughout both days in our Exhibit Hall.

Another great incentive for our conference, being a veteran of the conference circuit, is food is provided (which also lends to the creative credo - if you feed them, they will come). Breakfast, lunch, cocktail/snack hour, and a great keynote address banquet is all included in the conference packages.

Your registration also includes a free Thursday night pass to Milwaukee Irish Fest, the largest Celtic celebration in the United States.

Click here to view the conference website, or contact us for special discount codes and rates!

Hope to see you all at the conference. Together we can make this a rousing success!

Kevin

Monday, July 7, 2008

Create Crop marks instantly in Quark and InDesign

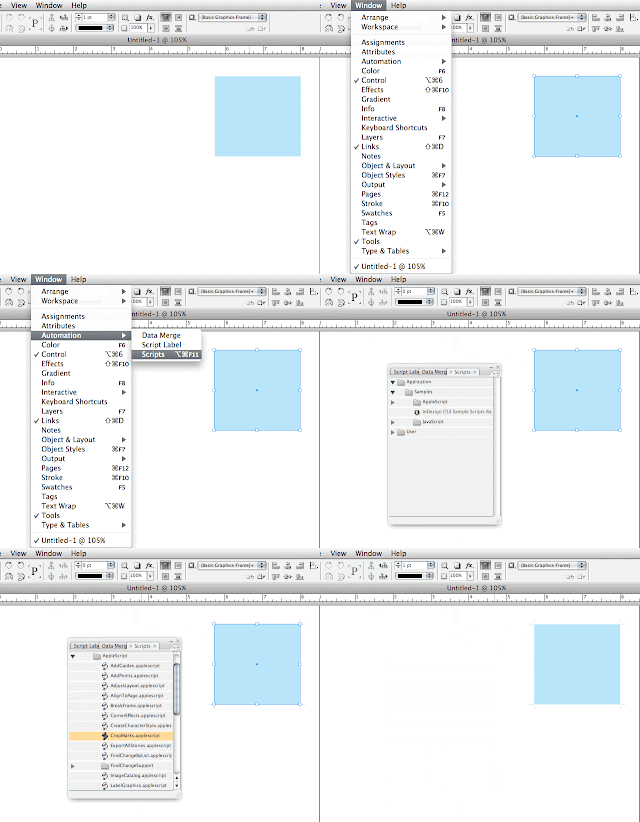
Creating crop marks can be a time consuming operation. Luckily both Adobe InDesign and QuarkXPress for the mac have scripts built in that can automate this process.

In QuarkXPress, select your object and go to the applescript menu and choose box tools > Add Crop Marks. After a few seconds the crop marks will be complete.
(click on image to see animation)

Inside InDesign, select your object and go to window > automation > scripts. Now in this panel choose application> samples > applescript or javascript > crop marks. Follow the onscreen directions and you are done!
(click on image to see animation)

Monday, June 30, 2008

Double-Clicks inside InDesign

Adobe InDesign has a bunch of hidden tricks, just by using the double click. Here are a few.

  • Double-Click the hand tool in the toolbar and you will fit a spread in the window
  • Double-Click the hand tool in the toolbar and you will zoom to 100%
  • Double-Click a graphic frame with the black arrow and you will select the frame with the white arrow (CS3 only)
  • Double-Click a graphic with the white arrow and you will select the frame with the black arrow (CS3 only)
  • Option/Control Double-Click a graphic frame to edit original
  • Option/Control Double-Click a text frame to open text frame options
  • Double-Click a text frame with the black arrow and you will switch to the type tool

Monday, June 2, 2008

Tracking in Adobe and Quark


Tracking is the process of changing the space between a selection of letters. In QuarkXPress people are used to tightening up the space by changing the amount to -1, -2, or -3 and most people are comfortable with these amounts. If you have been using Quark for awhile and then jump into InDesign, Illustrator or Photoshop and try to use tracking, you may run into some issues. Quark and Adobe measure tracking differently.

In QuarkXPress tracking is measured in units 1/200th of an em. In Adobe applications this is measured in units 1/000th of an em. This means that you are using to measuring -1, -2, or -3, you will need to multiply that number by 3 to get the same results in any Adobe application. Therefore you new numbers to type in for tracking are -5, -10, and -15.

Monday, May 19, 2008

Paste in Place


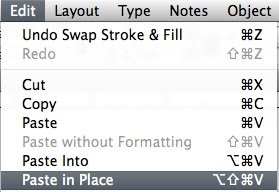
A commonly overlooked function of Adobe InDesign and QuarkXPress is paste in place. If you copy something to the clipboard, and then go to another page and just paste, it will go in the center of the screen. But, if you choose paste in place from the edit menu it will be pasted in the same XY coordinates that you copied it from.

Monday, May 12, 2008

Drag a copy in InDesign

If you ever need another copy of an object inside InDesign, you could use the duplicate command, copy and paste or an even better method. When you have an object selected with your black arrow, hold down the Option key (ALT for PC) and you can click and drag a copy of your object. As an added bonus, if you double click while you see the double arrow on a placed graphic, you can edit the original graphic in its native program.

Monday, April 28, 2008

Save your Find/Change Queries inside InDesign


A useful feature of Adobe InDesign CS3 is the ability to save your find/change queries. After entering your find/change operation, click on the little floppy disk icon(if you can still remember what those are) and you can save your query. The next time you need to use this find/change you will be able to load it from the drop down menu.
It is also possible to bring your find/change query to another computer(or even sell on ebay if it is a really good search). Below are the locations of the the locations of the findchange file(which is saved as a small .xml file).

Mac OS: Users\[username]\Library\Preferences\Adobe InDesign\[Version]\Find-Change Queries\
Windows XP: Documents and Settings\[username]\Application Data\Adobe\InDesign\[Version]\Find-Change Queries\
Windows Vista: Users\[username]\AppData\Roaming\Adobe\InDesign\[Version]\Find-Change Queries\

Monday, April 21, 2008

Change the Default font in InDesign


Personally, I am really sick of Times New Roman. Every time I make a new text frame and start typing inside Adobe InDesign, the text will be Times New Roman. Luckily, I have changed by default font to something else. Here is how you do it.
1. Close all documents you have open.
2. Click on the type tool.
3. Change the font to a new default font.
For every new text frame you make in new projects, this will be your new default font.

Monday, April 14, 2008

Create your own custom placeholder text inside InDesign.

I love the placeholder text that Adobe InDesign generates, but sometimes I get sick of having to use Lorem ipsum all the time. You can use your very own text if you wish. Just create a plain text file and name it "placeholder.txt" and place it in the same folder as InDesign. The next time you use the fill with placeholder text command it will use your own text file.

Monday, April 7, 2008

Library items that remember their X/Y Position inside InDesign


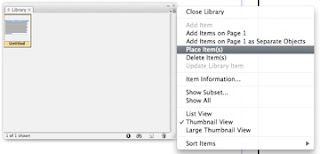
I always thought that the disadvantage of using a Library inside Adobe InDesign was the fact that you had to place the items where you wanted manually. I thought this was the case until last week when a student in a class pointed out that if you select a library item and choose "place item(s)" from the panel menu it will be placed at it's original X/Y position on the current spread. Previously, the only way to do this was with snippets, but now we have another.

Monday, March 24, 2008

How to round just one corner in InDesign.


Rounding corners is all the rage to day with the cool kids, but the problem is that if you try to use the corner effects/options menu in Adobe InDesign you will can only round all them. What if you want to be trendy and round just one, or two. Be crazy, what if you wanted to do three! Well, the answer my friend lies in the scripts panel.
To open the scripts panel go to window > automation > scripts. In InDesign CS2, you will not have any scripts. They are on your InDesign install CD, but CS3 does indeed install many scripts by default. Inside your scripts panel, is a script called corner-effects. To run the script, just select your object and double-click the script and enter your desired numbers in the options window and pops up.

Wednesday, March 5, 2008

InDesign and Flash CS4 preview

Last week at the InDesign Conference in Miami, Adobe showed off a pre-release version of InDesign. It showcases an amazing ability to export InDesign files to Flash.

part 1
http://www.youtube.com/watch?v=U3-0AtqeSng

part 2
http://www.youtube.com/watch?v=Vi-MNlNqPMk