This month, C2 Instructor Jake Stroh is sharing some great tips and tricks for Adobe Fireworks. Read up on this exciting addition to any designer's arsenal.
The key to profitability in web design and development is to build great prototypes for your clients, arrive together at a sign off point on the interface and then begin the build-out process.
This process can be further aided by demonstrating your prototype as a clickable PDF, where the navigation actually takes the user to the corresponding page of the prototype, or by exporting your Fireworks page layouts as a “demo” which produces a clickable flash slide show as a way to sell your design ideas to your clients.
Exporting a clickable PDF:
Once you have designed a navigation system that you like, it would be a good idea in an effort to save time, to create a Master page of this. To set your current page as a Master page, goto the PAGES palette and by using the palette pulldown menu, select “Set as master page”. Now when you create a new page all of your master page items will already be on the page.
Once all of your pages are prototyped you can then return to your master page, select the “Rectangle Hotspot tool” in the WEB section of the Tools palette. Drag a rectangular box across each navigation button. Once created you can select the cyan colored box and go to the inspector and select from the LINK pull down menu. This link menu will give you options to the names of each of your pages. If you took the time to name them (by clicking on the default names “01 PAGE” and typing in your own name), then it should not be all that hard to associate the named link with the proper Hotspot area.
With all of the hot spots LINKED to the proper pages, select FILE, EXPORT, Export as PDF. This will generate a multi-paged PDF that will jump to the proper page when the user clicks on the hotspot area.
Demo current document:
Another way to create an interactive slide show of your prototyped website, is to simply select COMMANDS, DEMO CURRENT DOCUMENT at any point during your design process. This will bring up a prompt that will give you the ability to CHECK which pages you wish to include in your presentation.
The benefits to this approach are: The presentation is viewed in a web browser and can be uploaded to a staging area for presentation on the we. A clickable thumbnail navigation appears when mousing over the bottom portion of your web browser and disappears when mousing off of the thumbnail navigation, which is a great non-intrusive way to present and navigate your designs.
Be mindful that this approach produces many files in order to work: Thumbnail and presentation images, HTML, XML, SWF and JS files produce this simply elegant way to present your ideas.
Showing posts with label tips. Show all posts
Showing posts with label tips. Show all posts
Monday, April 6, 2009
Tuesday, March 3, 2009
Flash CS4 Tips and Tricks
Remember the new tweens live on the object, NOT the timeline, so select the object first then move the red playback head to the new frame and make your changes. The changes are "property changes" not "keyframes".
You want an object to finish its tween then stay in that state for an extended time? Shift-drag the last frame to the right (if you just drag, you extend the animation).
Be very careful with the scroll wheel on your mouse when you are over an editable field in the property or motion inspectors - most of the fields are active the moment your cursor is over them and scrolling the wheel changes values (handy if you're aware it's happening, annoying when you're trying to navigate).
BONUS TIP: If you are using the scroll wheel to change values, adding the SHIFT key changes the values by 10, COMMAND-Mac/Control-windows changes values by .1
Friday, February 13, 2009
Instructor Tips and Tricks
 InDesign tips and Tricks:
Cmd+Opt+G will select all of the guides on any given page.
Cmd+click to select objects that are underneath other objects.
Shift-double clicking on the ruler will put a guide across the spread to the nearest tick mark.
Everyone knows that Cmd+A selects all, but few people know that Cmd+shift+A deselects all.
New in CS3 - Double-click to switch between the black and the white arrow.
New in CS3- If you are typing, hit ESC to "escape" out of a text box and select the box with the black arrow.
Duplicate and copy & paste is so last century. Opt+drag to drag a copy of whatever you are working on.
Monday, June 30, 2008
Double-Clicks inside InDesign
Adobe InDesign has a bunch of hidden tricks, just by using the double click. Here are a few.
- Double-Click the hand tool in the toolbar and you will fit a spread in the window
- Double-Click the hand tool in the toolbar and you will zoom to 100%
- Double-Click a graphic frame with the black arrow and you will select the frame with the white arrow (CS3 only)
- Double-Click a graphic with the white arrow and you will select the frame with the black arrow (CS3 only)
- Option/Control Double-Click a graphic frame to edit original
- Option/Control Double-Click a text frame to open text frame options
- Double-Click a text frame with the black arrow and you will switch to the type tool
Monday, May 12, 2008
Drag a copy in InDesign
If you ever need another copy of an object inside InDesign, you could use the duplicate command, copy and paste or an even better method. When you have an object selected with your black arrow, hold down the Option key (ALT for PC) and you can click and drag a copy of your object. As an added bonus, if you double click while you see the double arrow on a placed graphic, you can edit the original graphic in its native program.
Monday, April 21, 2008
Change the Default font in InDesign

Personally, I am really sick of Times New Roman. Every time I make a new text frame and start typing inside Adobe InDesign, the text will be Times New Roman. Luckily, I have changed by default font to something else. Here is how you do it.
1. Close all documents you have open.
2. Click on the type tool.
3. Change the font to a new default font.
For every new text frame you make in new projects, this will be your new default font.
Monday, February 11, 2008
How to removed a loaded cursor in InDesign

Have you ever accidentally clicked on a text frame in InDesign and turned your arrow into a loaded cursor? It is really annoying and easy to do. Here is any easy fix, if you ever get a loaded cursor and don't want it anymore just hit the "esc" key. This will remove the loaded cursor and put it back to the regular arrow. This trick only works with InDesign CS3.
Monday, January 21, 2008
Title-Case inside InDesign

A quick way to change the case of your headlines inside Adobe InDesign is to use the change case command. Select your headline and go to the type menu > change case > title case. This will automatically capitalize the first letter of each word in your headline and make the rest of the letters lowercase.
Tuesday, January 15, 2008
Photoshop's Copy Merged

Have you ever wanted to copy across multiple layers in photoshop without flattening your image? Try the "Copy Merged" from Photoshop's Edit menu. It acts as if the document is flattened and grabs everything under your selection no matter what layer it's on - if it's visible in your selection, Copy Merged will grab it. Once you have it on the clipboard, paste the composited copy anywhere you like.
Thursday, January 3, 2008
Primitive tools in Flash CS3
If you didn't look close you may have missed two new tools in Adobe Flash CS3, the Rectangle Primitive tool and the Oval Primitive tool. They can be found in the toolbox under the Rectangle tool (press and hold on the icon to show the hidden tools). These new shape tools allow for very fast (and non-destructive) basic alterations to shapes that you draw. Imagine rounded corners that you can go back and tweak without remaking the shape or taking the center out of a circle without running a permanent Modify>Combine Objects>Punch
(see animation demoing below)

Wednesday, December 19, 2007
Where is this file saved?
Did you Mac users ever find yourself asking that? Here is an easy way to find out without going to "Save As..." or guessing.
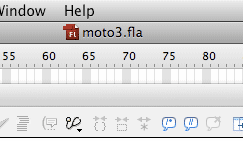
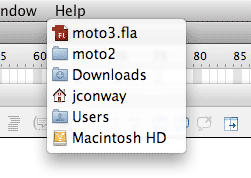


At the top of any document opened from your system is the title of the file. (in the example below it is "moto3.fla" with a little Flash badge in front of the name)
If you put your cursor over the name and hold down the Command key (sometimes called the Apple key) you will get a file path showing where exactly that file is. (see below)
(This also works in finder windows on the desktop)
Now this works a little different on things like web pages which are not stored on your computer. If you are in your web browser and you look at the top of the document window you will see the title the the web developer gave this document (it is not the name of the file saved on the webserver)
If you Command-Click on the title of a web page, you get the file path on the web server itself
Wednesday, December 12, 2007
Assign multiple keywords with one click in Adobe Bridge CS3
You have always been able to add keywords to images in Adobe Bridge but new in CS3 is the ability to apply sub-keywords and their parents in one simple click, assuming you have made a series of keywords that are related. I created an "animal" keyword that applies to all animals, a "dog" sub-keyword for dogs and a "Labrador Retriever" sub-keyword for just that breed of dog. If I click on just "Labrador Retriever" I apply only the keyword "Labrador Retriever" as shown below
 But why wouldn't I want to apply the parent keywords of "animal" and "dog" to this image also? I can do so with 1 click, not 3. If I shift-click on "Labrador Retriever" it adds that keyword and all its parents which is very frequently what I want
Tuesday, December 4, 2007
Power mail searching in Leopard (Mac OS X 10.5)

In any Spotlight search field (NOT just in the Mail program - this works in the Finder also) if I do a search structured like this:
from:erica to:tiffany
I get just the emails I've received from Erica that also were mailed to Tiffany (watch to make sure you don't put any spaces either side of the colon - search will break)
If I do the following search:
from:jfritz to:jsimon -subject:seminar
I get the mails I've received from jfritz that jsimon was cc'd on removing any results that include the word "seminar" in the subject (note the minus sign in front of subject)
This is a great way to narrow down your search results fast
Subscribe to:
Posts (Atom)